 Aurora
Create your first collection in ArtLab
A complete first-project walkthrough: prepare layers, choose traits and rarity, review combinations and render a collection ready for your next steps.
On this page
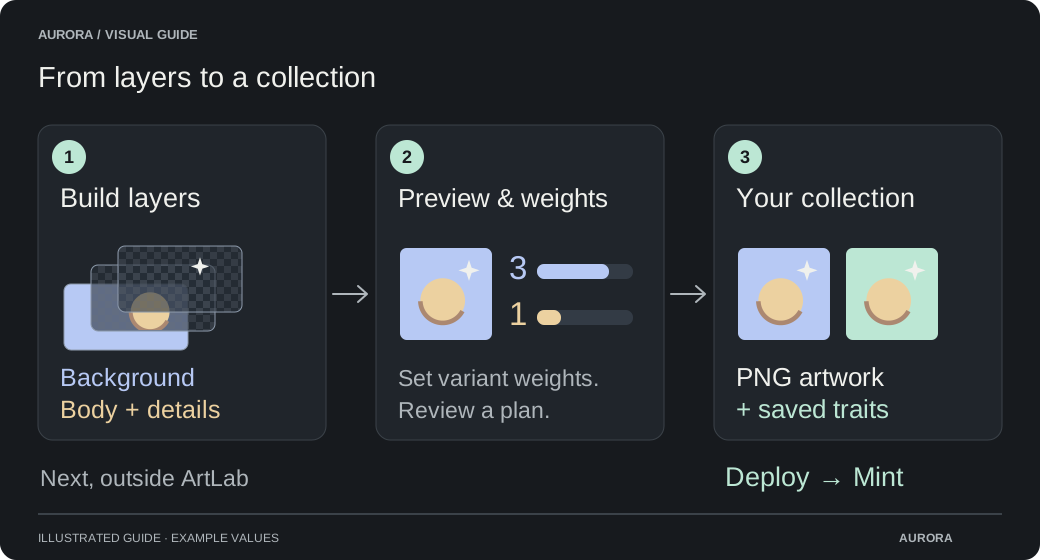
What you will create
ArtLab combines images you upload into finished artwork. You draw the backgrounds, characters and details; ArtLab chooses compatible variants, places them in order and saves each result with its title, description and traits. For example, a Background layer with a Blue variant produces a Background: Blue trait.
Your source project stays separate from the finished collection. You can save your work, inspect combinations and change settings before rendering. An active Premium Pass is required to use ArtLab. Building artwork does not require a deployment or mint transaction.
| Term | What it means |
|---|---|
| Project | Your reusable source images, layer order, links, trait names and weights. |
| Plan | A saved set of compatible combinations to review before starting a render. |
| Rendered collection | The finished images and saved metadata in Collectibles Studio. Each image becomes available as rendering progresses. |
| NFT collection contract | The onchain collection you can deploy and mint into after preparing the artwork. ArtLab does not deploy it for you. |
See a finished example: Naked Apes
Naked Apes is an Aurora ArtLab demo collection. Its artwork was generated from layered images in ArtLab, then deployed and minted through Aurora. Browse the collection on OpenSea to see the finished characters and their traits.
Use it as a reference while preparing your own backgrounds, bodies, facial features and details. The walkthrough below starts with a smaller example so you can learn the same process one step at a time.
Follow the walkthrough or open a detailed guide
This page follows the four wizard steps: Collection, Layers, Preview & rarity, and Render. The other ArtLab guides explain individual controls and help with more complex projects.
Prepare layers, set traits and link matching artwork
Set rarity weights and understand the resulting counts
Start with a small collection you can inspect
For a first project, prepare two backgrounds, three bodies, two eye styles and two detail images. Use the same 1024 × 1024 canvas for every file, with transparent backgrounds for everything above the background layer. Keep each body, face and accessory in the same position in your drawing app.
With Count toward uniqueness enabled on all four layers, these independent choices give 2 × 3 × 2 × 2 = 24 possible selections before the pixel checks. Start with a collection size of 6 so you can inspect every result. You can return to the editor and make a new plan later.
| Layer, back to front | Example variant names | Trait on a finished artwork |
|---|---|---|
| Background | Blue, Sand | Background: Blue |
| Body | Ivory, Brown, Gold | Body: Gold |
| Eyes | Open, Sleepy | Eyes: Sleepy |
| Details | Glasses, Earring | Details: Glasses |
1. Collection: start and save your project
Open ArtLab
Connect and verify your wallet, open Collectibles Studio and choose ArtLab in the toolbar. Enter a collection name and choose Start a project. Your projects lists saved work when you return; open a project there to continue.
Set up the collection
In Collection, enter a name and Description, set Collection size to the number of images you want, and choose Canvas size. For the example above, use 6 artworks at 1024 × 1024. The description is added to every rendered artwork; you can edit individual pieces in Collectibles Studio afterward.
Save and resume
Use Save progress before leaving the editor. Uploads save automatically; editing layer names, positions or weights requires saving or moving to another wizard step. Your projects are private and remain available when you return.
2. Layers: upload and arrange the artwork
Layers are drawn in the order shown. Start with a background, then add the body, clothing, facial features and details. Move a layer earlier to put it behind another layer, or later to put it on top.
Choose a layer and upload its image variants, individually or as a group. Transparent PNGs work best for upper layers; still WebP and JPG are also supported. Each file can be up to 10 MB and 16,777,216 pixels in total, enough for a 4096 × 4096 layer. Saved source images preserve up to 4096 pixels per side. Exporting every image on the same square canvas preserves alignment. Other aspect ratios are fitted and centered.
Layers include traits by default: layer names become trait types and variant names become trait values. Rename both in the editor, or turn off Include in traits for a layer that should appear only in the artwork. Horizontal and vertical offsets are percentages of the output canvas; Size scales the layer around its center. Anything outside the canvas is clipped. Use the live preview selectors to inspect particular combinations.
Detailed layer preparation and editor controls
Fill the starter layers
Open Layers and select Background. Upload its two image variants, then repeat for Body, Eyes and Details. Each file becomes one selectable variant. Rename the variants to the trait values you want collectors to see.
Check the stack
Background should be first, Body next, then Eyes and Details. Use Move earlier (behind) or Move later (on top) to adjust the order. Select a layer and use Add layer or Remove layer as needed; remove unused empty layers before planning.
Inspect the composition
Choose individual variants in the live preview and try different combinations. Check the eyes against every body and the details against every face. Use the layer position and Size controls for corrections shared by every variant in that layer.
Choose the output resolution
The canvas size sets the dimensions of each final square PNG. Choose 4096 × 4096 for 4K output, and upload source layers at that resolution to preserve their detail. Enlarging a smaller image does not create new detail. Private layer thumbnails and the browser preview are smaller for quick browsing; the final render uses the saved source files.
Layers previously reduced to 2048 pixels are not restored automatically by choosing 4096 output. Re-upload the original high-resolution files and use those variants before rendering if you need full 4K detail.
Larger canvases and more layers take longer to render and use more storage. Each final PNG must still fit within the 10 MB artwork limit. If a result exceeds that limit, the render pauses with an explanation; reduce the canvas size or simplify the source artwork in a new plan. Already-saved artwork stays available.
Render a layer without adding a trait
Turn off Include in traits for visual layers such as lighting, shadows, texture or a signature. The editor marks these layers Artwork only. Their selected images still render in the same stacking order, but their layer names and variant values are omitted from the artwork’s metadata.
Artwork-only layers keep their weights, optional skip settings, links, positioning and preview controls. Include in traits and Count toward uniqueness are separate settings: hiding a trait does not exclude its layer from uniqueness. Every layer still participates in the full final-image duplicate check. The collection plan shows their composition counts so you can review their visual distribution; the trait-layer total counts only layers that include traits.
Omitted traits do not appear in gallery trait filters or contribute to rarity calculations. Changing this option affects newly rendered artwork. It does not rewrite metadata or artwork already generated into a collection.
Choose which differences make an artwork unique
Every layer has Count toward uniqueness enabled by default, including in existing projects. Turn it off for Background, lighting or other decoration if a change in that layer alone should not create another character. The layer still appears in the artwork, keeps its weights and links, and can still be saved as a trait.
For example, with independent required layers, 10 backgrounds × 5 bodies × 4 eyes give 200 full selections. If Background does not count toward uniqueness, there are at most 5 × 4 = 20 distinct character selections. Links and visually identical source images can reduce what is actually available; optional skips can change the count. Keep at least one layer counted, save the changes and create a new plan.
Changing this setting does not rewrite artwork or metadata already saved in Collectibles Studio. To apply it to another render, return to the editor and plan again. Collections that have minted NFTs remain ineligible for a full replacement from a new plan. Fix layer order preserves existing traits rather than applying this setting to them.
Link layers and variants that belong together
Use the layer’s link controls when the whole layer should only appear with particular traits. For example, link a Fur details layer to Body → Ivory and Gold. ArtLab includes that layer only when the selected Body variant is Ivory or Gold. Otherwise it is automatically skipped, with no image or metadata trait, even if its optional skip weight is zero.
Use an individual variant’s links for matching artwork within a layer. For example, link an Ivory shirt to Body → Ivory, and a Gold shirt to Body → Gold. Those shirt variants cannot be chosen with another body. The layer still needs at least one compatible variant or an optional skip for each combination you want to use.
Selecting several variants from one linked layer means any of those variants may match. Adding another linked layer means both conditions must match. For example, a crown can require Body → Gold and Head → Bare. Links can form chains and remain attached when layers are reordered; drawing order still determines which image is on top.
Circular links are not allowed. Remove links that reference a layer or variant before deleting it. The live preview, shuffle, server preview, collection plan and final render all respect these rules. If a chosen preview cannot satisfy every required layer, ArtLab shows the problem instead of displaying an invalid composition.
3. Preview & rarity: choose how often variants appear
Weights are relative within each layer. For example, weights 70, 20 and 10 give target selection chances of 70%, 20% and 10%. Multiplying every weight by the same number does not change those targets. Weight 0 excludes a variant. Weights are whole numbers from 0 to 10,000.
Use Skip this layer to make a layer optional. Its weight joins the same pool as the image variants. A skipped layer adds no image and no trait to the artwork. With variant weights 3 and 1 and skip weight 1, the target chances are 60%, 20% and 20% skipped.
The target chance of a variant is its weight divided by the sum of eligible variant weights and the skip weight. Links narrow that pool for each combination. The initial weight of a complete combination is the product of those per-layer chances. ArtLab keeps each selection of variants and skips from the layers counted toward uniqueness at most once per plan. Changing only an excluded layer cannot create another planned character; that layer still uses its weights and links when choosing the full artwork.
Weights are targets, not promised edition counts or rarity ranks. The final distribution depends on randomness, compatibility rules, collection size, visual duplicate checks and the unique combinations still available. With links, the editor’s combination number is an upper bound; planning checks what is actually compatible. When every possible full combination is used with all layers counted toward uniqueness, weights affect order but cannot change the resulting counts.
Review the collection plan before rendering
Inspect the preview
Shuffle the live composition, inspect individual variants and render a server preview. Change layer order, offsets, scale, names or weights until the results look right.
Create a collection plan
In Preview & rarity, choose New collection and give the output collection a name. Choose Create collection plan. Review the sample artwork and expand each layer to compare its target percentage with its planned percentage and count. Artwork-only layers show composition counts rather than metadata traits. Duplicate checks for counted layers and final images run during rendering and can change these counts.
Adjust if needed
Choose Back to editor to change links, weights or artwork. Creating a new plan selects a new set of combinations. During rendering, ArtLab replaces visually identical results with unused compatible combinations and saves any replacements with their updated traits and counts.
Check character uniqueness and the finished image
Different layer selections can still produce the same final image: an opaque top layer may cover a background, or two variants may contain identical visible artwork. ArtLab checks two full-resolution images before saving: the composite of layers counted toward uniqueness on a transparent canvas, and the complete final artwork. A duplicate in either check is rejected. File metadata, compression and invisible colors in fully transparent pixels do not count as differences.
When the result is identical, ArtLab skips it and tries an unused compatible combination. Progress shows how many identical results were skipped. Saved artwork, replacement choices and final trait counts remain consistent, including after a pause or server restart. The completed plan shows the actual final distribution.
If no unused compatible combinations remain, the render pauses without saving a duplicate. Add visible variation or reduce the collection size in a new plan. A long run of identical candidates also pauses so you can resume searching or edit the layers. Already-saved artwork remains available.
These checks prevent exact pixel duplicates within one ArtLab render. With Background excluded from uniqueness, the same character cannot be saved again just because its background changes. This is not perceptual or AI similarity detection, and separate render jobs are not compared. Different pixels can still look similar, so review the collection before minting.
4. Render: create or replace the collection
Choose New collection to create a private collection, or Re-render existing collection to replace artwork in a collection you already manage. If the name already exists, ArtLab offers that collection instead of silently replacing its artwork. Choose the destination, create a plan and review the sample artwork before starting.
A full replacement from a new plan is available only when no NFTs have been minted and no artwork is reserved. A deployed contract can stay attached while you replace eligible artwork before minting. ArtLab shows why a collection is unavailable and checks it again before starting.
Re-rendering preserves the collection name, contract, profile picture, banner and collection settings. Before replacing artwork, ArtLab shows the collection name, how many existing artworks will be permanently deleted and how many new artworks will be generated. Confirm this change explicitly. Deleted artwork and its saved metadata cannot be restored through ArtLab. An empty destination is confirmed as Render into collection, with no existing artwork to delete.
ArtLab saves full-resolution PNG artwork, titles, descriptions and traits into the chosen collection in Collectibles Studio. Opening that collection gives you the normal metadata editor, artwork controls and mint setup. Existing sharing settings stay in effect: a shared collection can show its new artwork as rendering progresses. Replacing artwork does not change the contract or publish new NFT metadata to it.
Rendering runs on the server and progress is saved after each artwork. You can close the page and return later. Pause stops further saves; Resume continues from the last saved artwork without duplicating it. If the server restarts, storage fills up or Premium access ends, the render pauses and explains what needs attention.
A partial render can be kept. Pause it and choose Keep artwork & edit project to change the layers and create a fresh plan. Already-rendered images remain until you explicitly confirm another replacement; use New collection if you want to retain them separately. To replace a completed or partial render, return to the editor, create a new plan and choose Re-render existing collection. Resume continues the current job without clearing its saved output again. Deleting an ArtLab project removes its source layer files and plan, while rendered collections remain intact.
ArtLab does not deploy a contract, upload NFT metadata to public storage or start minting. Review the completed collection, then choose Set up mint for the separate guided deployment and minting steps. ArtLab trait weights are separate from OpenRarity and AuroraRarity rankings, which are calculated from the collection’s resulting metadata and supply.
Correct the drawing order while keeping every character
If a rendered collection has the right traits but a detail is behind the wrong layer, choose Fix layer order in the original ArtLab project. Move the saved layers from back to front, preview the existing characters and redraw. Their exact variant choices, image IDs, titles, descriptions and saved traits stay the same, including later metadata edits. Trait counts and trait-based rarity stay the same too.
This uses the saved render recipe and original source files. It does not make a new random plan or delete the collection before starting. Each earlier image remains until its correction saves successfully. A paused correction can be resumed, and exact duplicates pause rather than changing a character’s traits.
Reserved artwork and metadata or reveal locks can block a correction. For minted artwork with editable metadata, ArtLab saves a media draft; the creator must separately Review & Publish it. ArtLab does not change the published NFT artwork automatically.
Review the collection before making it public
Edit artwork details and trait CSV files
Understand OpenRarity and AuroraRarity
Deploy your collection contract
Open the finished collection
Choose Open collection. Check all six images in the example, open their traits and confirm that the names, description and artwork match. For larger collections, use smaller cards or list views and trait filters to inspect groups of artworks.
Check metadata and rarity
Use Metadata & CSV to edit titles, descriptions and traits. Before minting, your creator workspace can preview OpenRarity from all saved artwork, each counted once. This also works after deployment or an eligible re-render while the selected contract has no known mint history on that network. ArtLab weights describe generation choices; the collection’s resulting traits determine rarity rankings.
Choose Set up mint
Start from the completed render or open the collection and choose Set up mint. The six steps cover Artwork, Contract, Mint page, Mint settings, Schedule and Review & publish. Confirm your permanent network and contract type, save the page, then set the proceeds wallet, supply, phases and reveal. Saved setup can be resumed; save edits before leaving. Deployment alone does not open the mint, and each required wallet approval stays under your control.