 Aurora
Use placeholders & reveal artwork
Set a placeholder, complete a scheduled reveal or force the committed artwork to appear early.
On this page
Choose the right artwork flow
Available choices depend on the collection’s contract. Older fixed-metadata collections cannot gain editable metadata or delayed reveal just by changing the website.
| Option | How it works |
|---|---|
| Reveal on mint | The final artwork is available as the NFTs are minted. |
| Reveal later | Collectors see a placeholder until you confirm the committed artwork reveal. |
| Create placeholders to replace later | Mint placeholder items, then replace their media and publish supported metadata updates later. |
Set the placeholder image
Open the placeholder controls in mint settings
Generate and preview a placeholder, or upload your own supported image. Use the preview to check what collectors will see.
Save before publication
Choose the final placeholder before the release locks its inventory or placeholder URI. The editor shows when it is no longer editable.
Understand edition copies
In an ERC-1155 placeholder release, all copies share one placeholder artwork and token ID. Updating that edition’s metadata changes what every copy references.
Complete a scheduled reveal
Reveal later sets a planned time, not an automatic transaction. Collectors see the placeholder and an artwork reveal countdown on the public mint page. If the time passes without a confirmed reveal, the page shows Awaiting creator.
Save and publish the reveal schedule
Aurora commits the selected artwork and reveal time as part of the supported launch flow. Artwork used by that commitment is protected against conflicting edits.
Open the release’s reveal controls
Go to Collectibles Studio, open your collection and expand NFT collection. Select the correct network and open the public mint release. Find Reveal artwork in the release controls, including when the release is stopped or completed. Connect the collection owner wallet and publish or discard any saved mint changes first.
Return at or after the reveal time
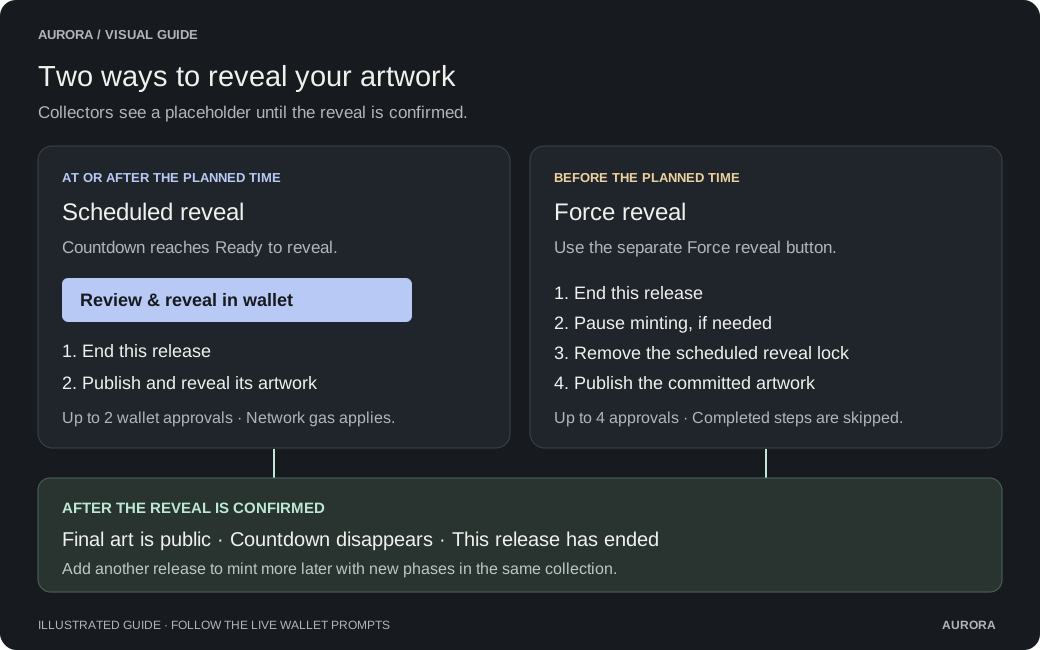
Scheduled reveal in counts down to the planned time, then changes to Ready to reveal. Review & reveal in wallet becomes available when the time arrives. Aurora does not automatically submit or fund the transaction.
End this release and reveal the artwork
Choose Review & reveal in wallet and review the details. Complete up to two owner-wallet approvals: end this release, then publish and reveal its artwork. If the release has already ended, Aurora skips that approval. Network gas applies. Keep the popup open until all steps confirm. Collectors keep seeing the placeholder until the reveal confirms.
Force an early reveal
To reveal before the planned time, use the separate Force reveal button in the reveal panel. This publishes the same committed artwork early; it does not replace it with different artwork.
Force reveal also works for paused, sold-out and ended releases. It permanently ends the current release without reopening minting. Already-completed steps are skipped; an ended release can still need a contract pause before publication. You can mint more later through Add another release with new phases in the same collection.
Choose Force reveal
Open the same release’s Reveal artwork panel before the countdown ends. Choose Force reveal in the separate Force an early reveal section and review the action.
Follow the numbered wallet approvals
Stay in the popup as Aurora shows your progress, such as 2/4. The flow uses up to four transactions: end this release, pause minting if needed, remove the scheduled reveal lock, then publish the committed artwork metadata. Completed steps are skipped. Each transaction needs the owner wallet and network gas.
Finish the final reveal transaction
Wait for confirmation of the artwork publication. Removing the scheduled lock alone does not reveal the artwork. The countdown disappears only when the reveal is confirmed.
What changes after reveal
- The final committed artwork becomes public and replaces the placeholder. Wallets and marketplaces may need time or a metadata refresh to display it.
- The artwork reveal countdown disappears after confirmation. Reaching zero by itself does not reveal the artwork.
- Both scheduled and forced reveals through Aurora permanently end this release. It cannot be resumed by changing its dates or adding a phase to that ended release.
- The collection remains available for future minting. Choose Add another release, add new phases with your chosen dates, prices and whitelist, then publish with your wallet. This keeps the same collection and contract address. The launch flow resumes any remaining mint pause; ordinary supply limits and any separate permanent collection closure still apply.
- Reveal does not enable NFT transfers. Trading settings are a separate choice.
- Cancel scheduled reveal only removes the scheduled commitment; it does not publish the final artwork. Use the reveal action when you want collectors to see it.
Replace placeholder artwork later
For a supported editable collection, replace the minted placeholder item’s media and details in your collection, then use Publish NFT updates. Saving an edit alone does not change the onchain metadata reference. Existing editions with already published artwork keep that artwork when more copies are minted.